Dashlights Brightness Controller Switch Test/Replacement
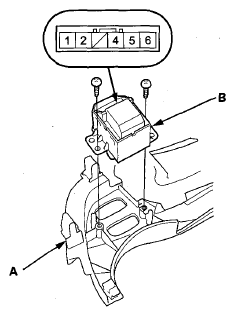
- Remove the instrument fascia (A) (see
INSTRUMENT FASCIA REMOVAL/INSTALLATION
).
 Courtesy of AMERICAN HONDA MOTOR CO., INC.
- Remove the two screws and dashlights brightness controller switch (B) from the instrument fascia.
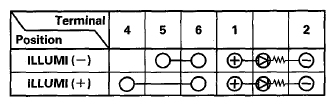
- Check for continuity between the terminals in each switch position according to the table.
NOTE:
- Make sure the correct test lead (+ or -) is placed on the terminal.
- When checking for continuity across the diode, use the diode setting () on the digital volt/ohm meter to check the diode bias.
- Note this important operating characteristic; diode bias causes a diode to fully conduct electricity in one direction (forward), while not at all in the opposite direction (reverse).
 Courtesy of AMERICAN HONDA MOTOR CO., INC.
- If the continuity is not as specified or the LED does not turn on, replace the switch.
- Install the switch in the reverse order of removal.