Transmission Installation
- Cleaning the ATF cooler (see ATF COOLER CLEANING
).
- Install the transmission lower mounts.
 Courtesy of AMERICAN HONDA MOTOR CO., INC.
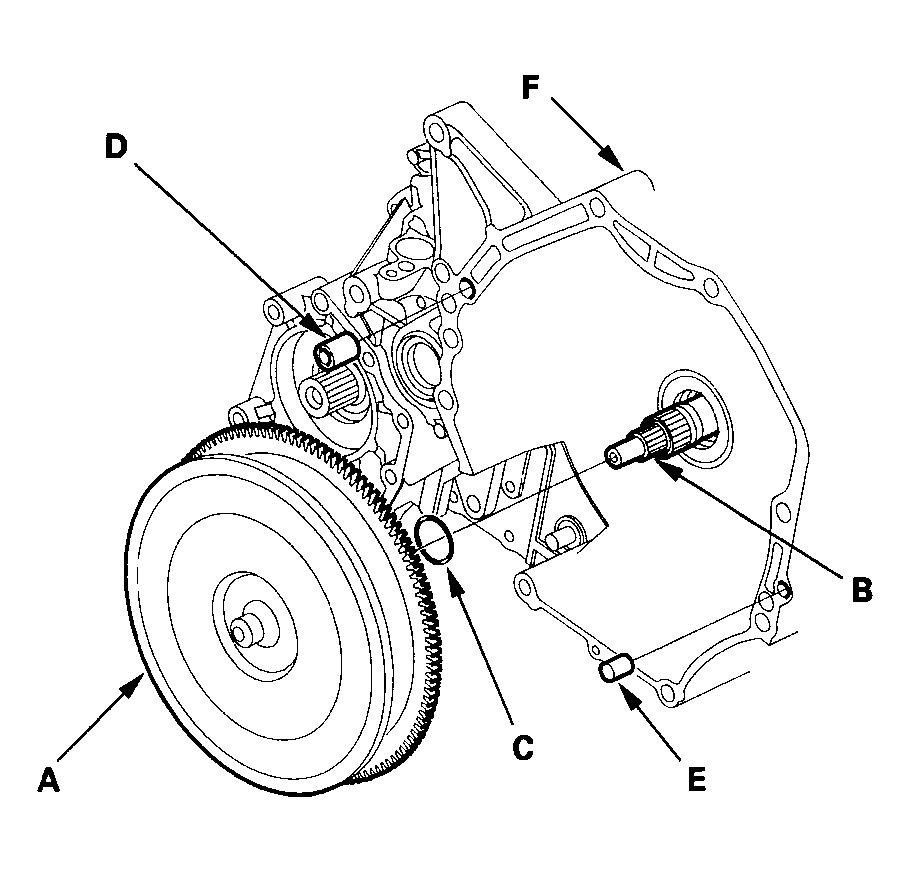
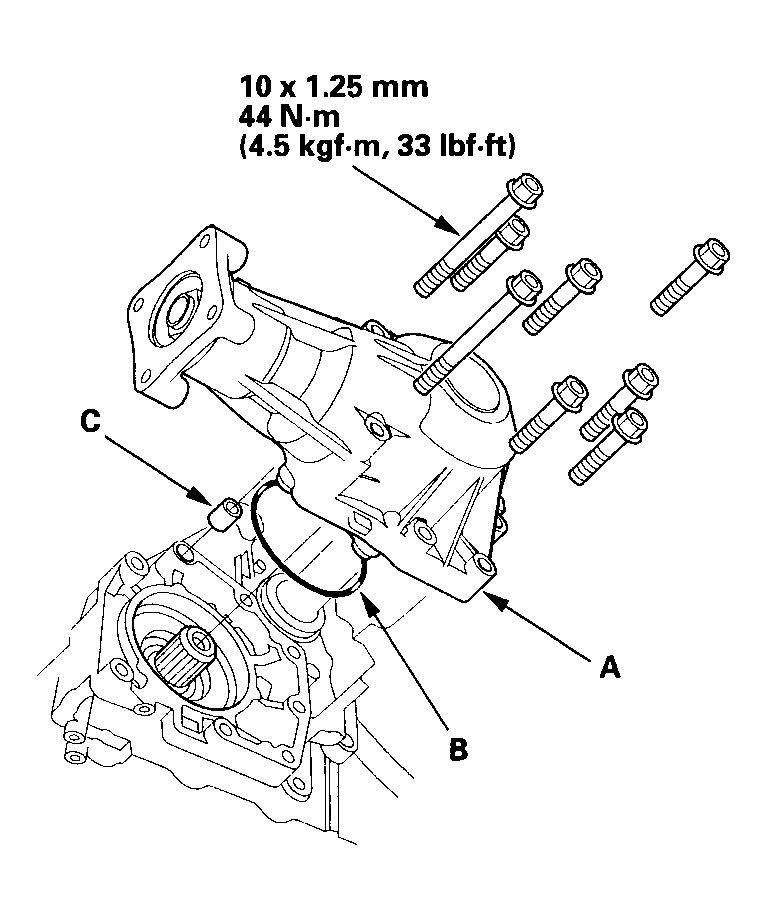
- Install the torque converter assembly (A) on the mainshaft (B) with a new O-ring (C).
 Courtesy of AMERICAN HONDA MOTOR CO., INC.
- Install the 14 mm dowel pin (D) and 10 mm dowel pin (E) in the torque converter housing (F).
- Place the transmission on a jack, and raise it to engine level.
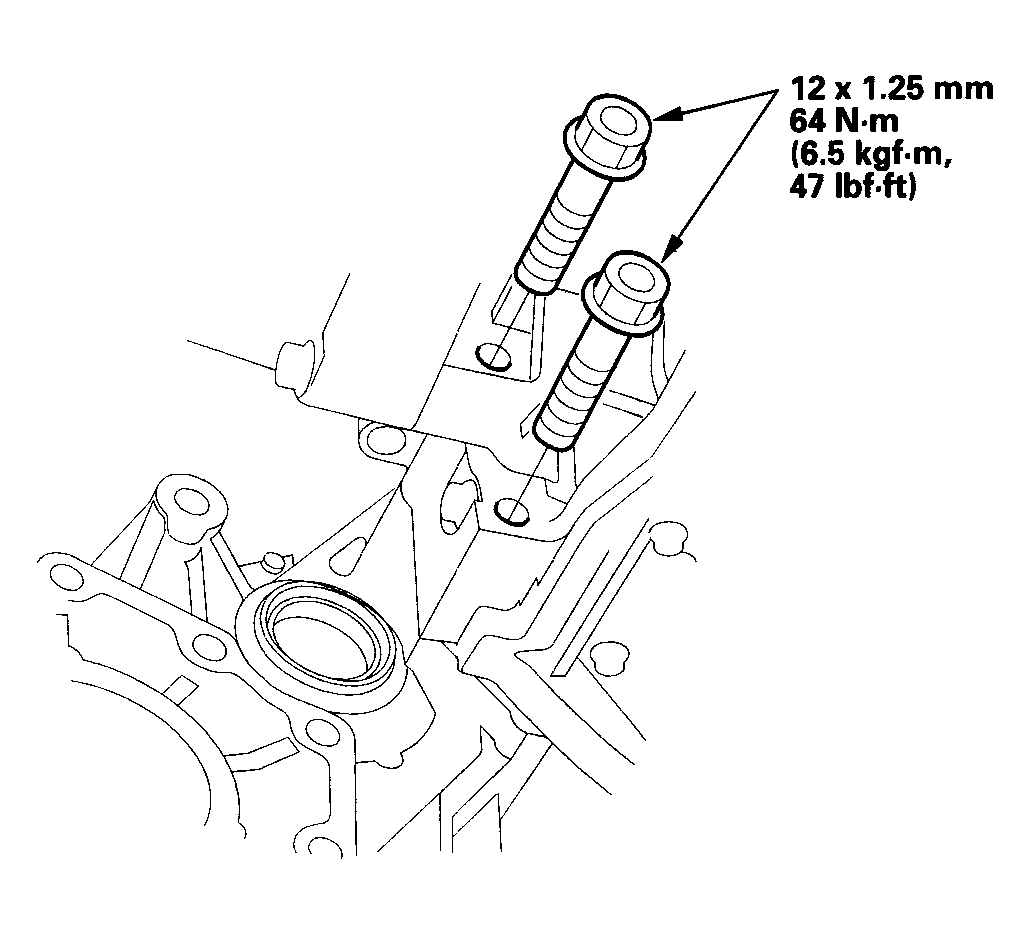
- Attach the transmission to the engine, then install the transmission housing mounting bolts.
 Courtesy of AMERICAN HONDA MOTOR CO., INC.
- Install the transmission housing mounting bolts.
 Courtesy of AMERICAN HONDA MOTOR CO., INC.
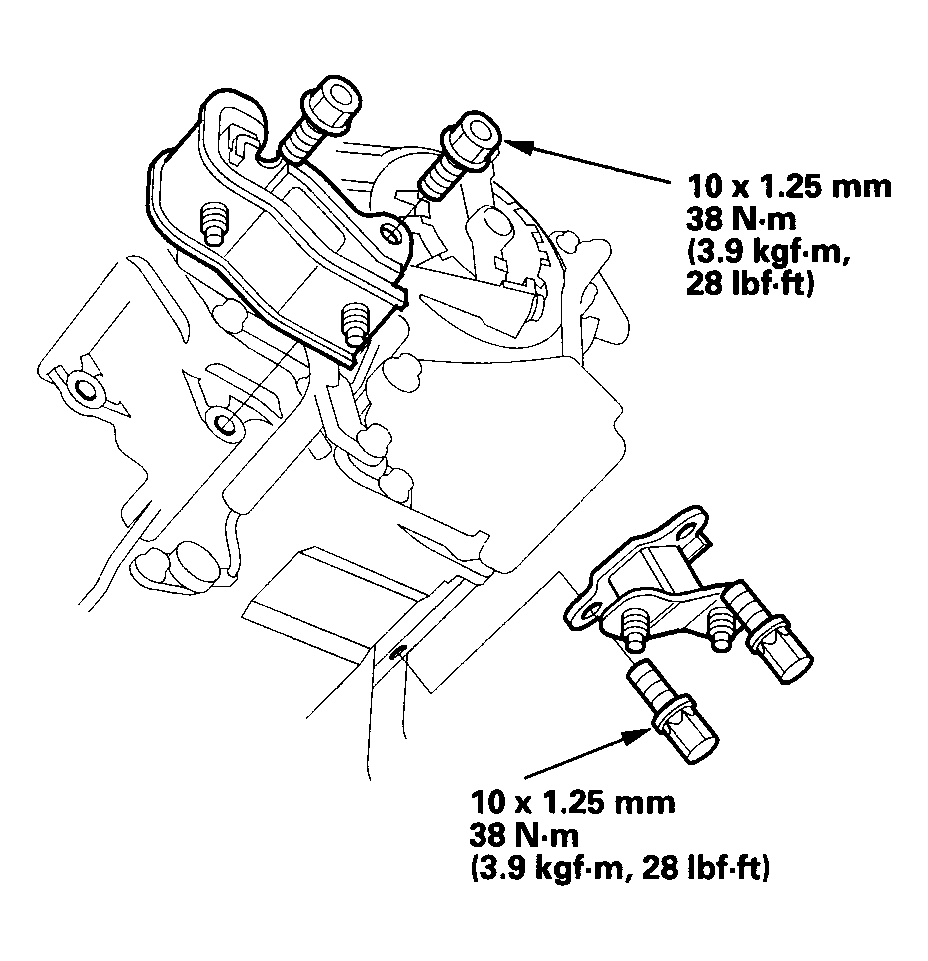
- Install the front mount bracket.
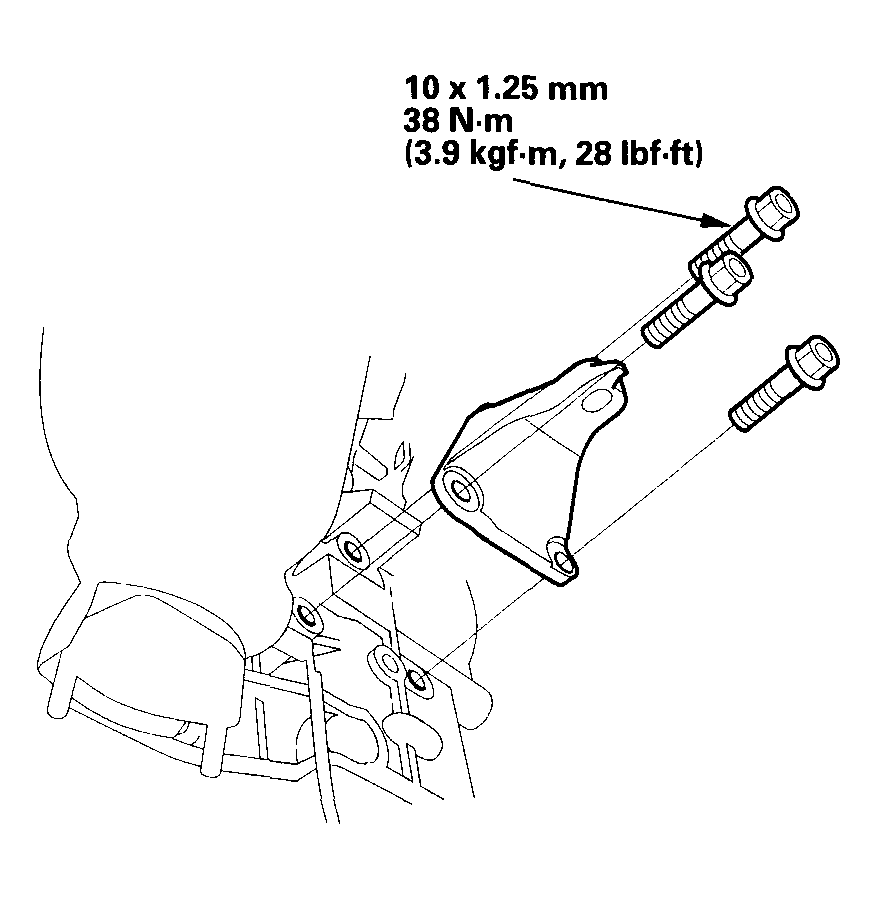 Courtesy of AMERICAN HONDA MOTOR CO., INC.
- Install the harness clamp on the mount bracket.
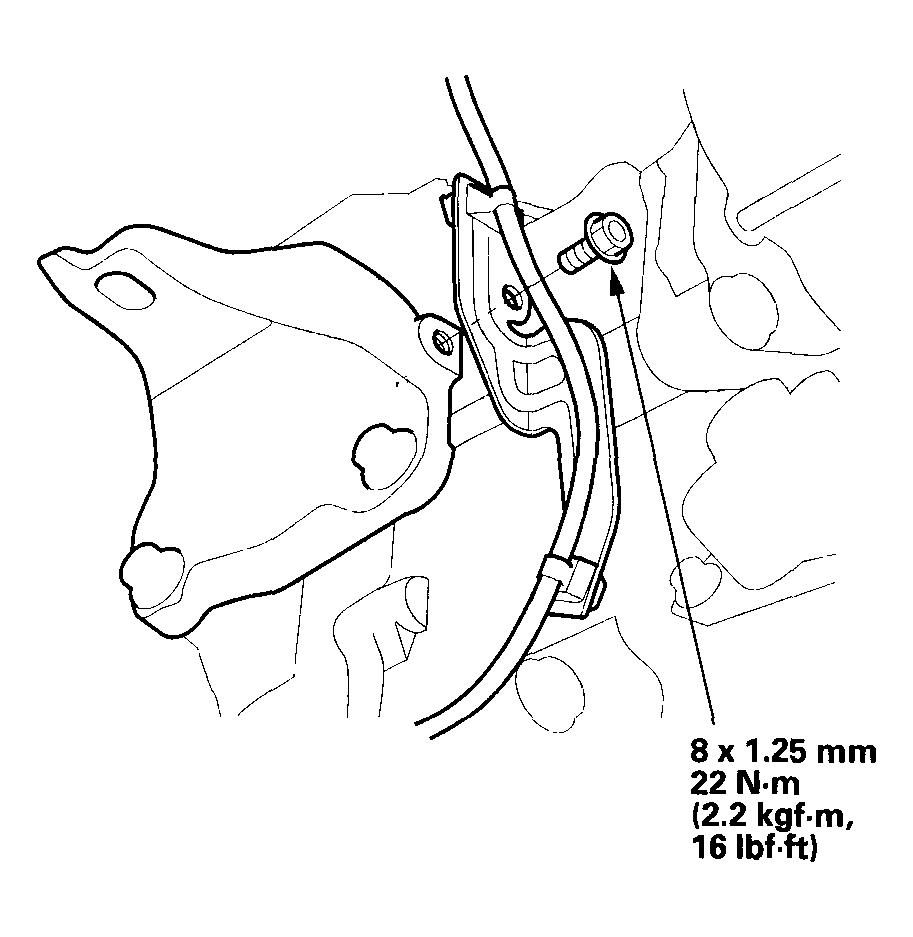 Courtesy of AMERICAN HONDA MOTOR CO., INC.
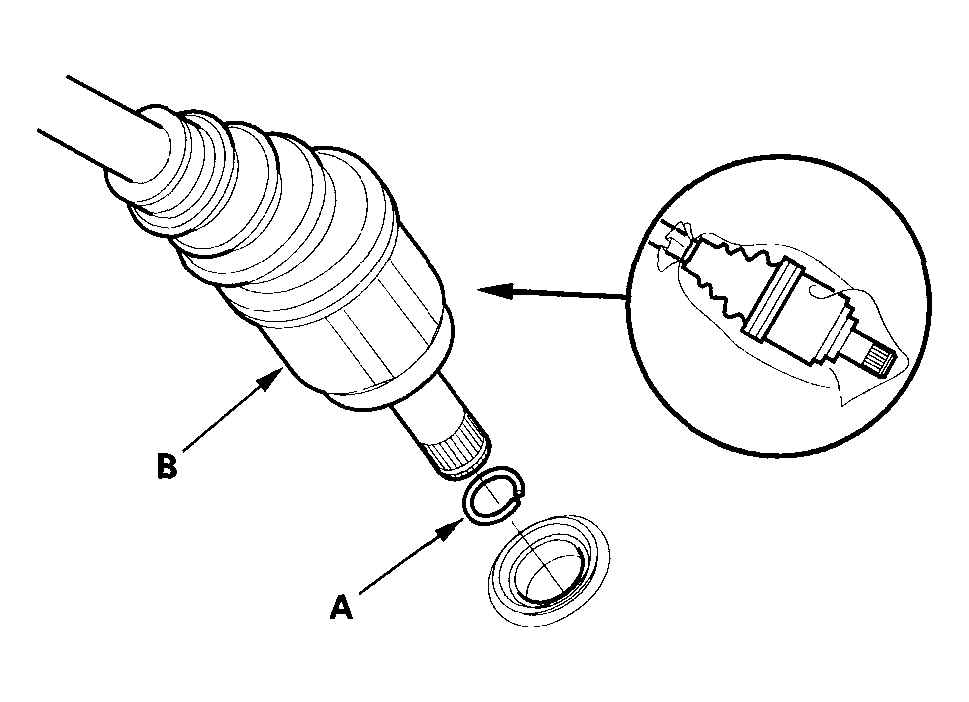
- Install a new set ring (A) on the intermediate shaft (B).
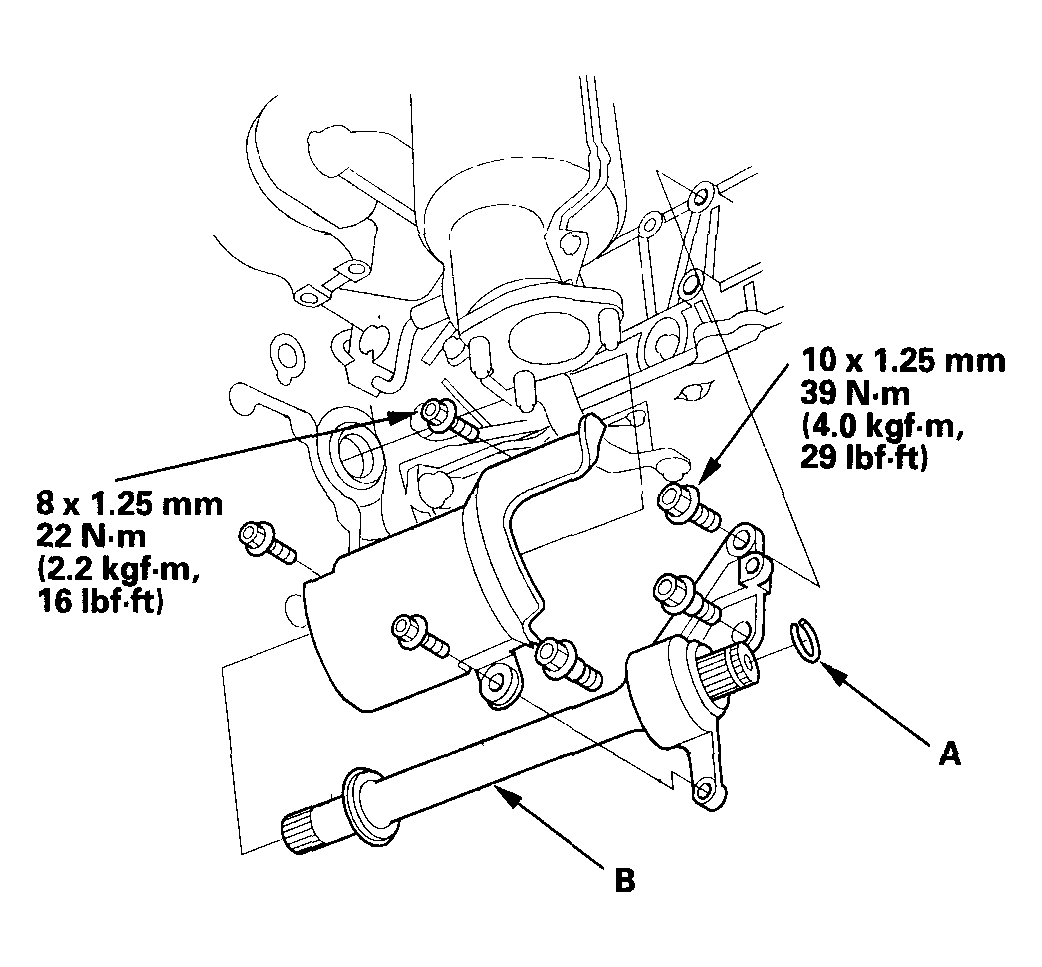 Courtesy of AMERICAN HONDA MOTOR CO., INC.
- Clean the areas where the intermediate shaft contacts the transmission (differential) with solvent or carburetor cleaner, and dry with compressed air. Then install the intermediate shaft in the differential. While installing the intermediate shaft, be sure not to allow dust or other foreign particles to enter the transmission.
- Install a new set ring (A) on the left driveshaft (B).
 Courtesy of AMERICAN HONDA MOTOR CO., INC.
- Install the right and left driveshafts (see
FRONT DRIVESHAFT INSTALLATION
). While installing the left driveshaft in the differential, be sure not to allow dust or other foreign particles to enter the transmission.
NOTE:
- Clean the areas where the left driveshaft contacts the transmission (differential) with solvent or carburetor cleaner, and dry with compressed air.
- Turn the right and left steering knuckle fully outward, and slide the left driveshaft into the differential until you feel its set ring engage the side gear. Slide the right driveshaft over the intermediate shaft splines until you feel the driveshaft engage the intermediate shaft set ring.
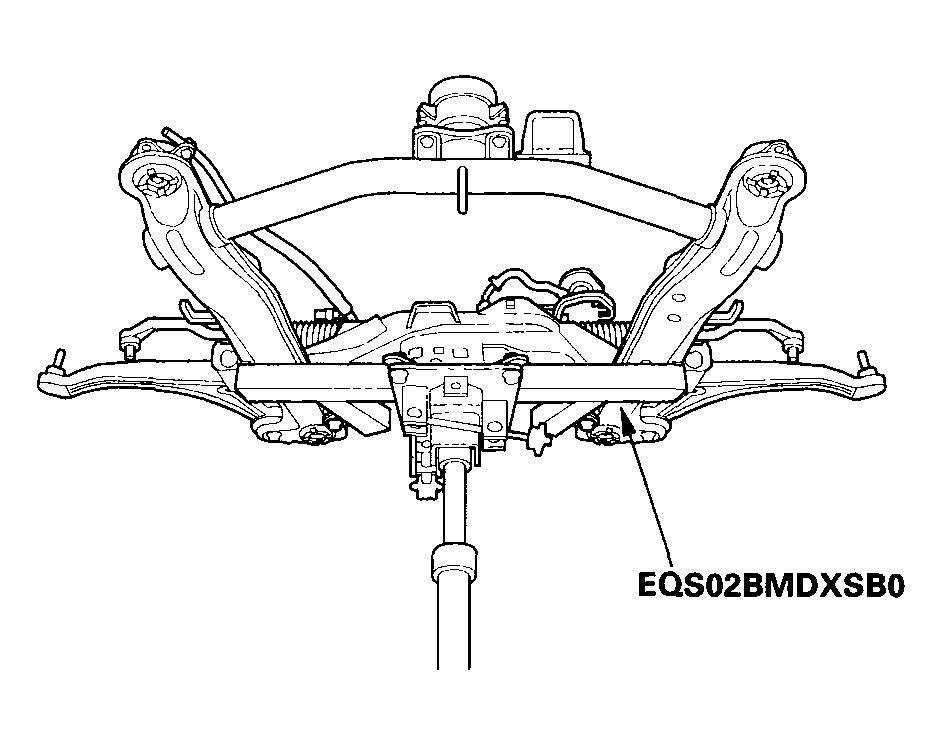
- Support the front subframe with the front subframe adapter (T/N EQS02BMDXSB0) and a jack, and lift it up to the body.
 Courtesy of AMERICAN HONDA MOTOR CO., INC.
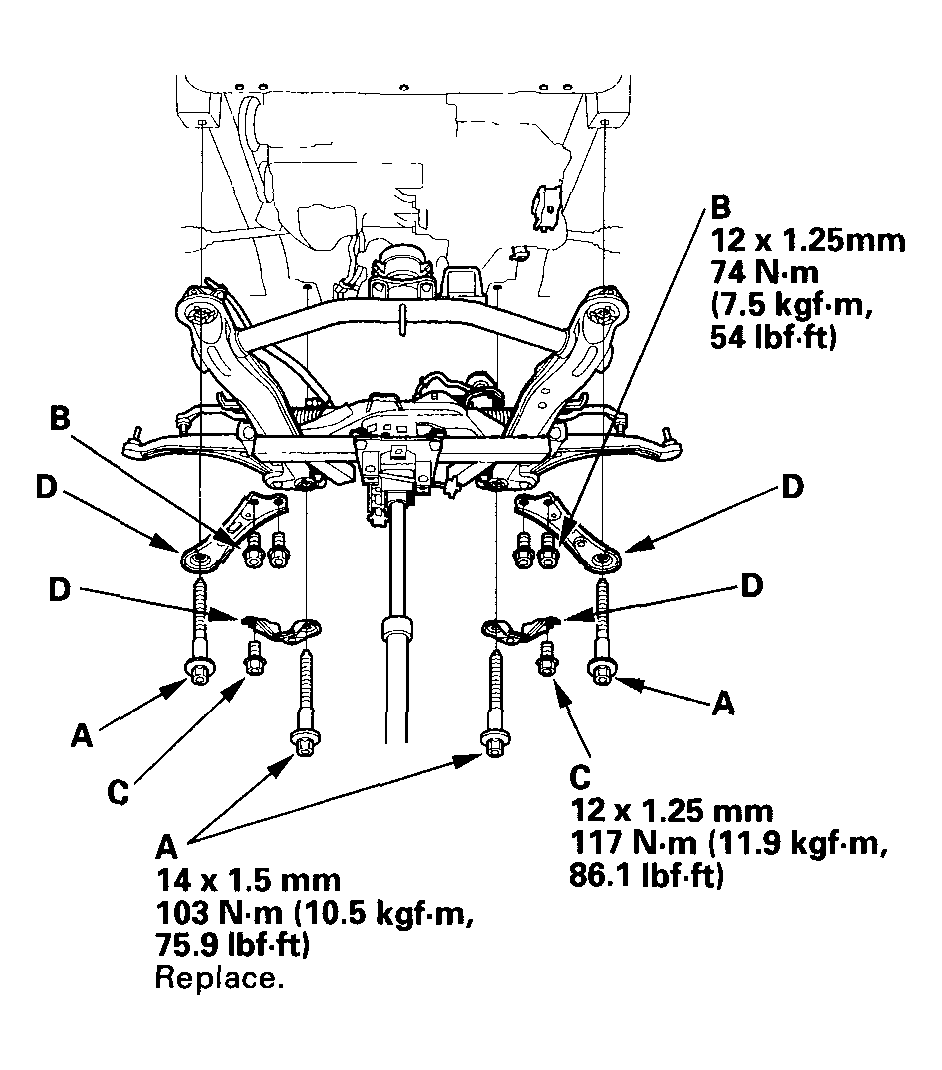
- Loosely install the four front subframe mounting bolts (A) and the 12 x 1.25 mm bolts (6) (B), (C) with the stiffeners (D).
 Courtesy of AMERICAN HONDA MOTOR CO., INC.
- Align all reference marks (A) on the front subframe (B) with the body, then tighten the bolts on the front subframe (C) to the specified torque.
 Courtesy of AMERICAN HONDA MOTOR CO., INC.
- Install the rear mount bracket bolts.
 Courtesy of AMERICAN HONDA MOTOR CO., INC.
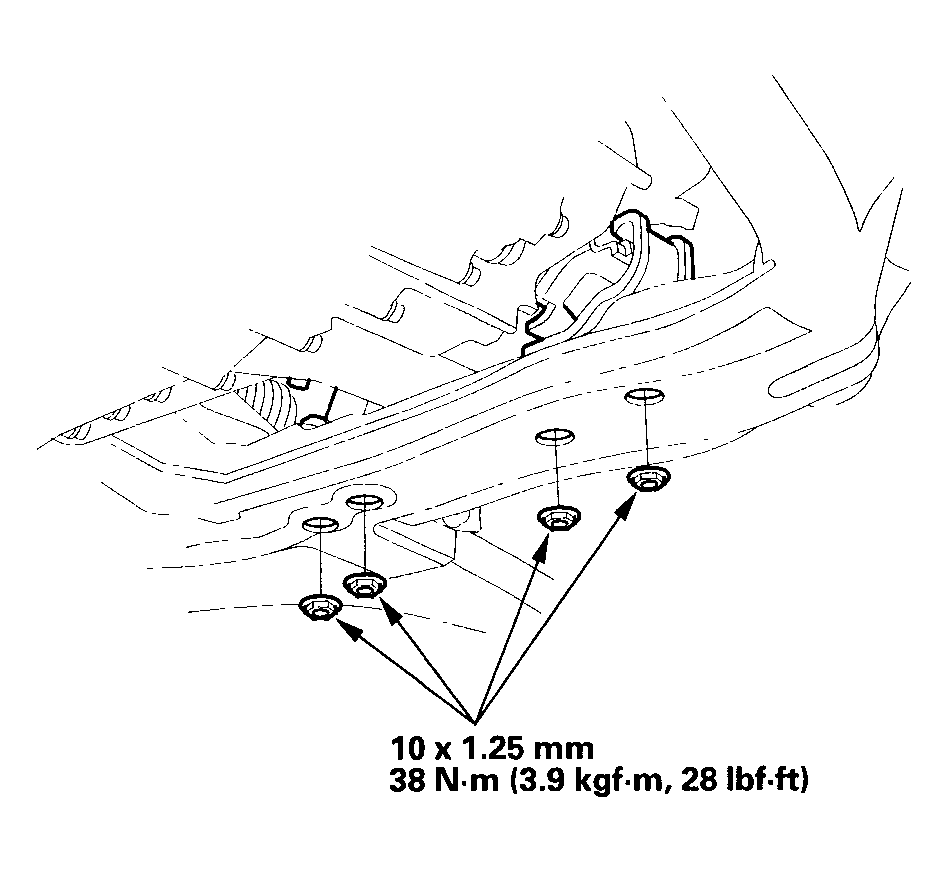
- Install the transmission lower mount nuts.
 Courtesy of AMERICAN HONDA MOTOR CO., INC.
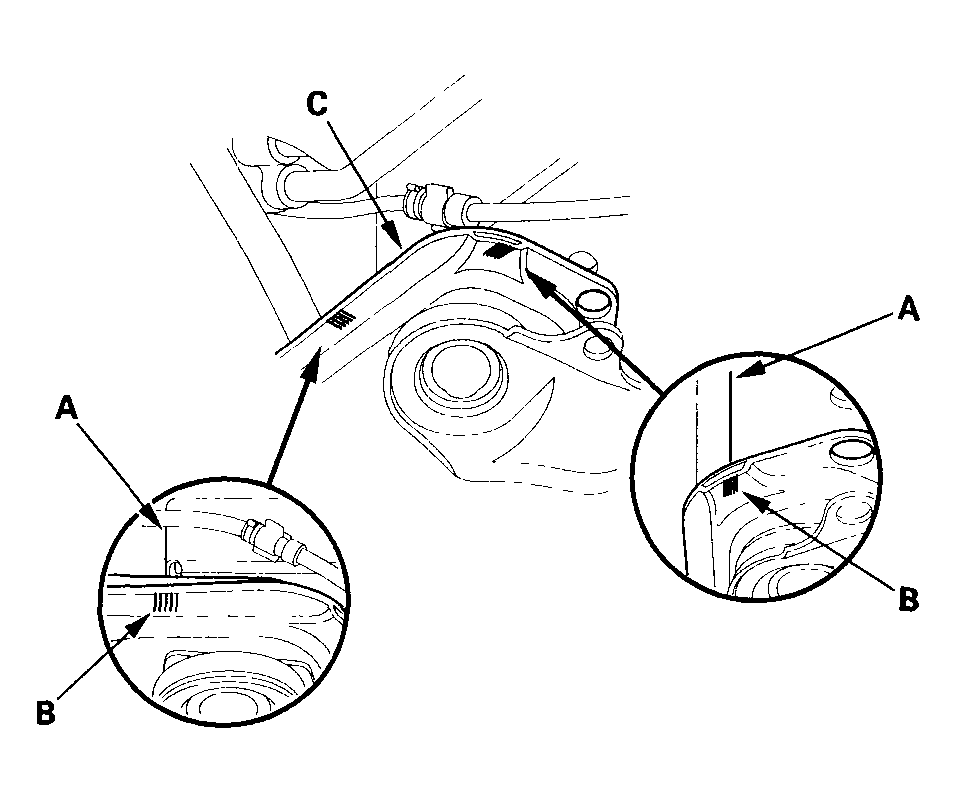
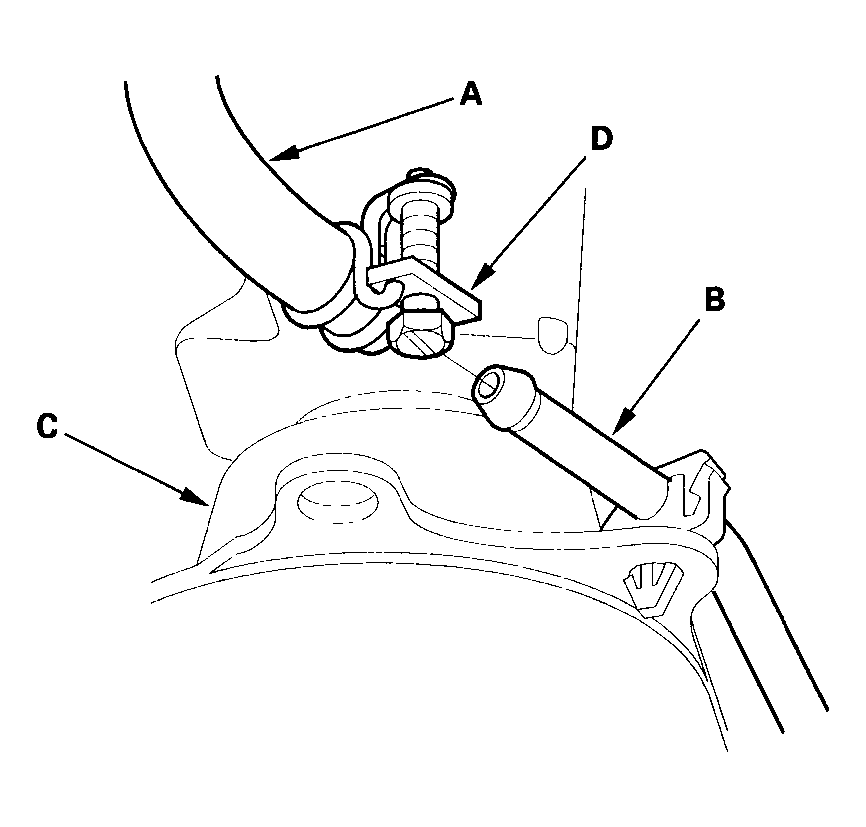
- Connect the power steering fluid hose (A) to the pipe (B) at the right front of the subframe (C), then secure the hose with its hose clamp (D).
 Courtesy of AMERICAN HONDA MOTOR CO., INC.
- Connect the power steering pressure switch connector.
 Courtesy of AMERICAN HONDA MOTOR CO., INC.
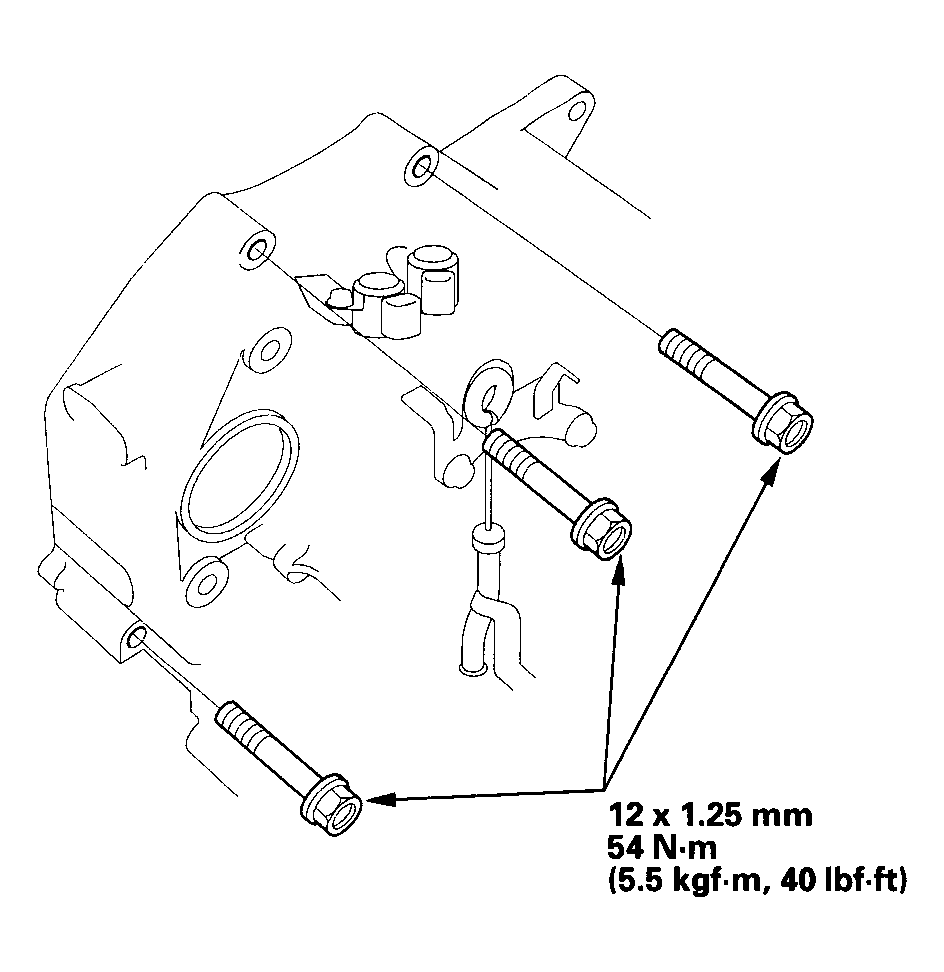
- Install the engine-to-torque converter housing mounting bolts (A).
 Courtesy of AMERICAN HONDA MOTOR CO., INC.
- Attach the torque converter to the drive plate (B) with eight bolts (C). Rotate the crankshaft pulley as necessary to tighten the bolts to 1/2 of the specified torque, then to the final torque, in a crisscross pattern. After tightening the last bolt, check that the crankshaft rotates freely.
- Install the torque converter cover (D).
- Tighten the crankshaft pulley bolt as necessary (see
INSTALLATION
).
- Install the transfer assembly (A) with the new O-ring (B), and dowel pin (C), on the transmission.
 Courtesy of AMERICAN HONDA MOTOR CO., INC.
- Tighten the bolts in a crisscross pattern in two or more steps.
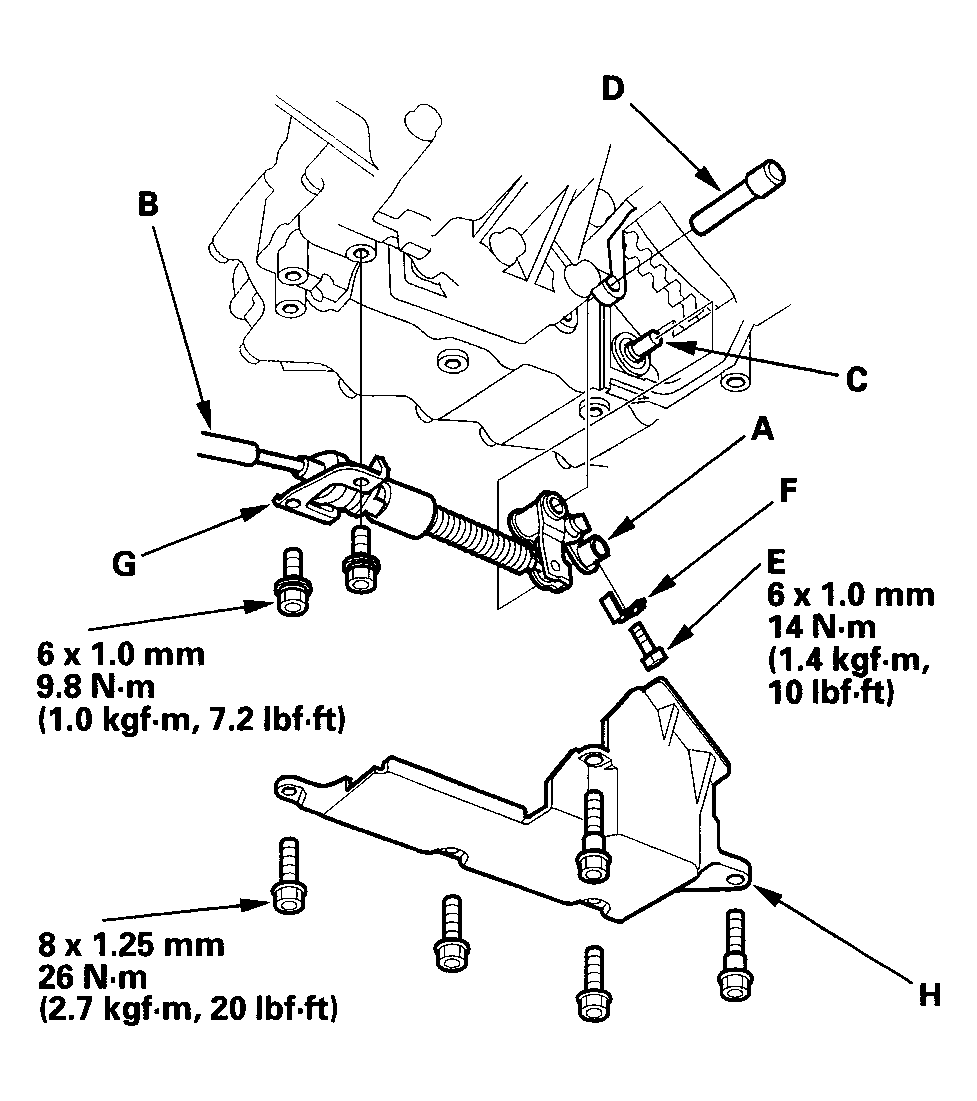
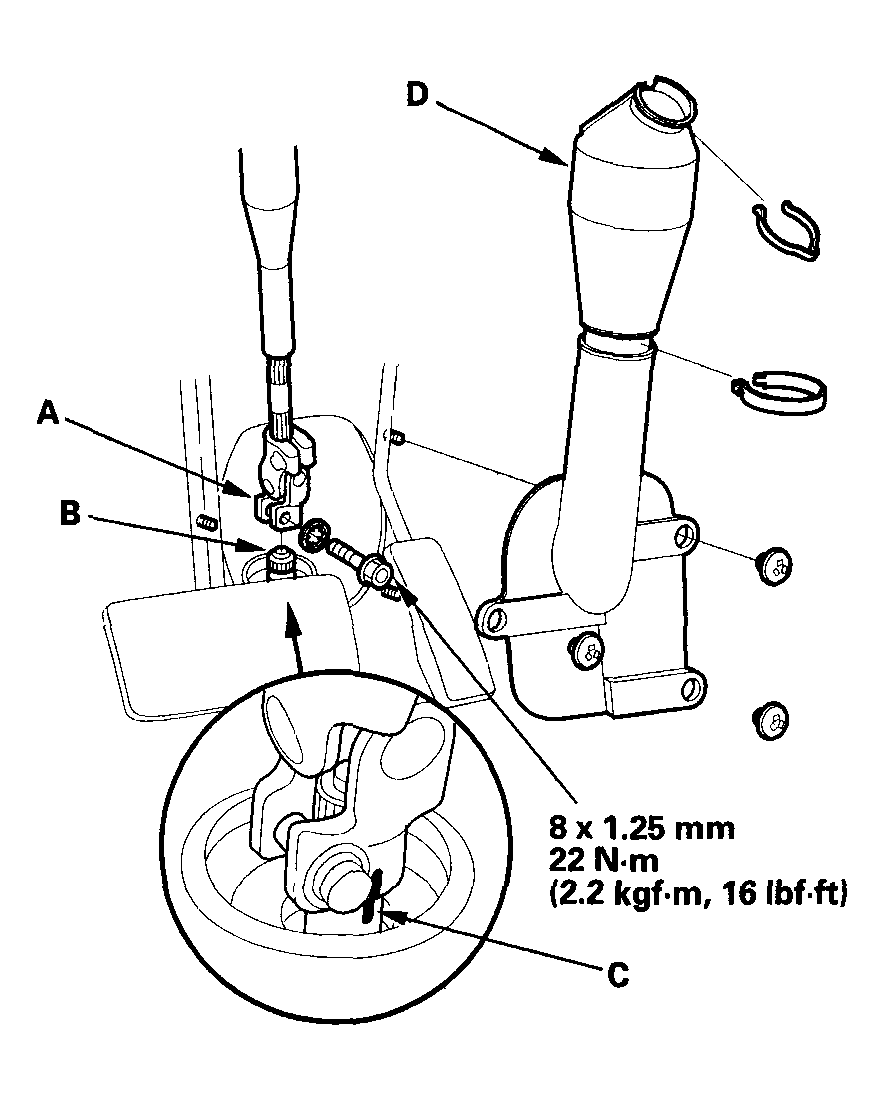
- Install the control lever (A) with the shift cable (B) on the control shaft (C), and install the change shaft (D). Do not bend to shift cable excessively.
 Courtesy of AMERICAN HONDA MOTOR CO., INC.
- Install the lock bolt (E) with a new lock washer (F), then bend the lock washer tab against the bolt head.
- Install the shift cable holder (G) and the shift cable cover (H).
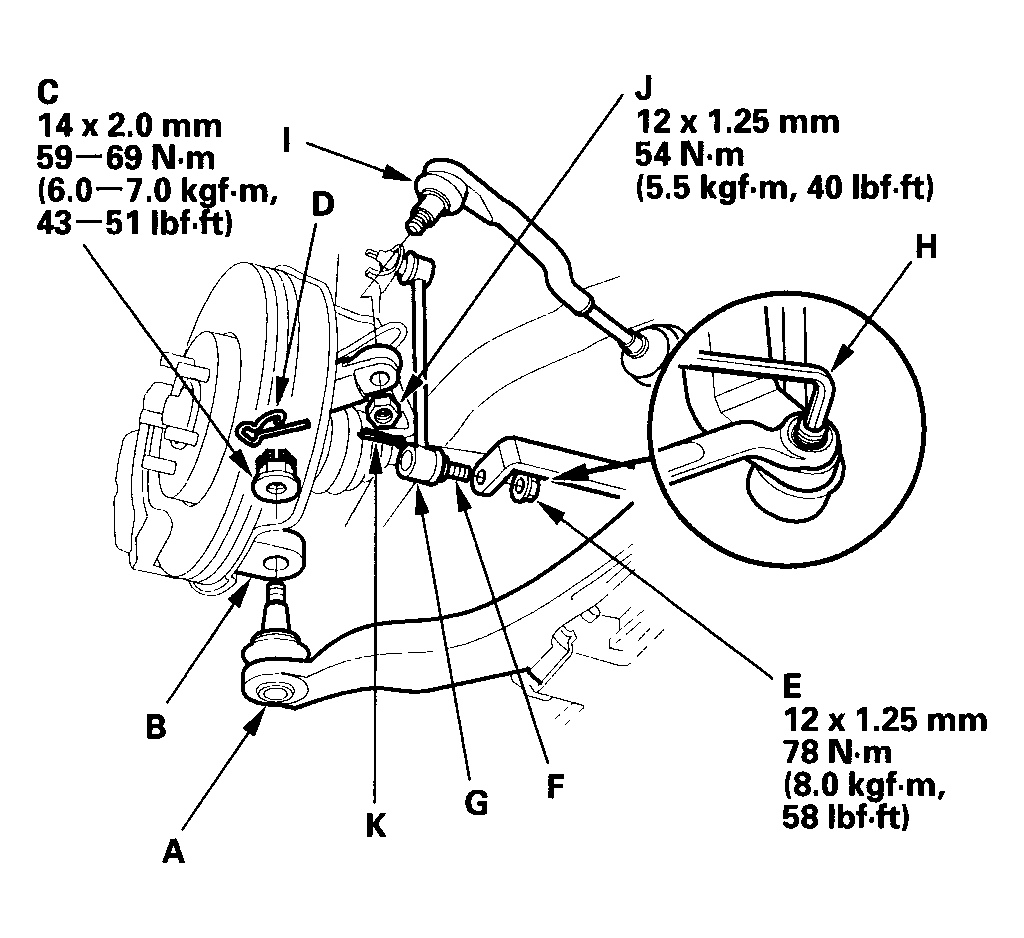
- Install the ball joints on each lower arm (A) to each knuckle (B) with the castle nuts (C) and spring clips (D).
 Courtesy of AMERICAN HONDA MOTOR CO., INC.
- Install the nuts (E) to the ball joint pins (F) on each stabilizer link (G). Insert a 6 mm Allen wrench (H) in the top of the ball joint pins, and tighten the nuts to the specified torque.
- Install the tie-rod end ball joints (I) to each knuckle with the nuts (J) and new cotter pins (K).
- Remove the transmission jack from the transmission.
- Install the propeller shaft (A) to the transfer companion flange (B) by aligning the reference mark (C).
 Courtesy of AMERICAN HONDA MOTOR CO., INC.
- Install the exhaust pipe (A) with the new gaskets (B).
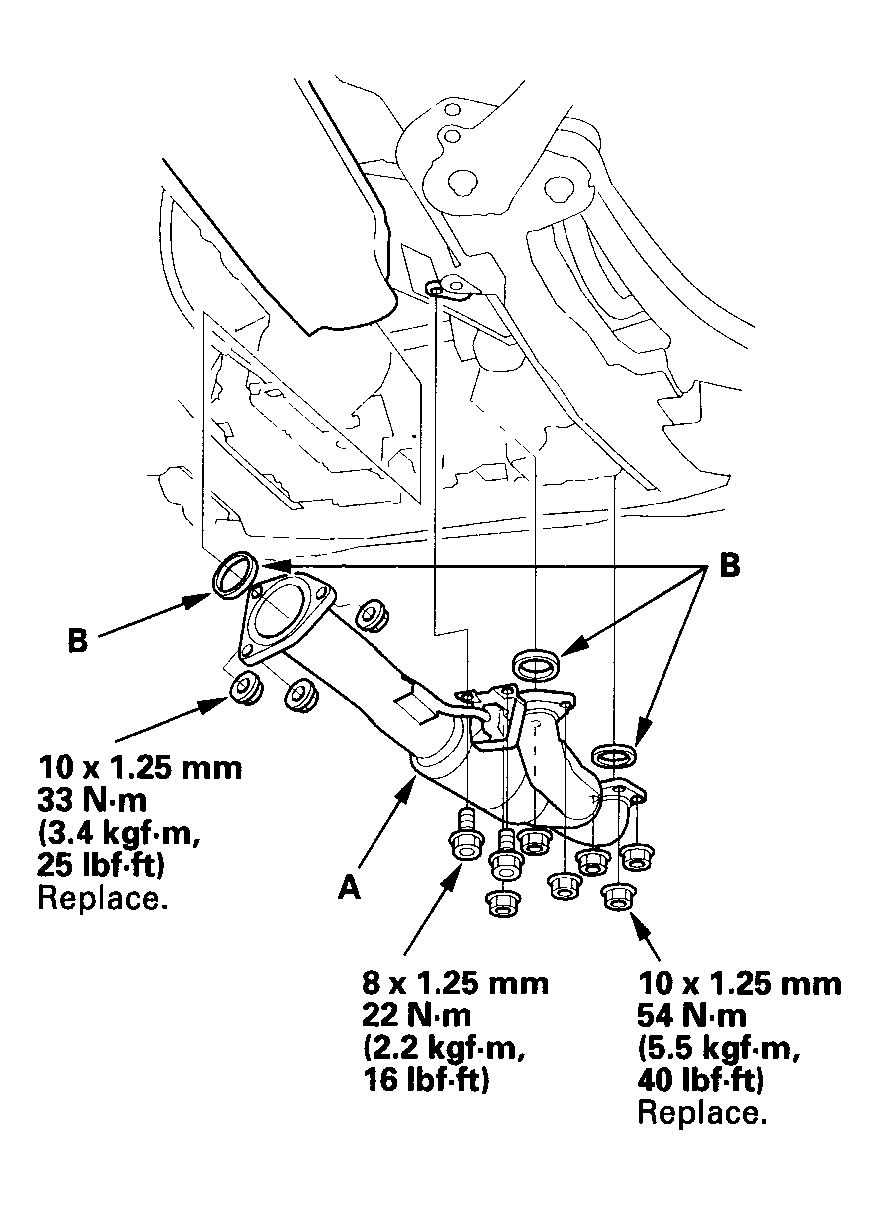 Courtesy of AMERICAN HONDA MOTOR CO., INC.
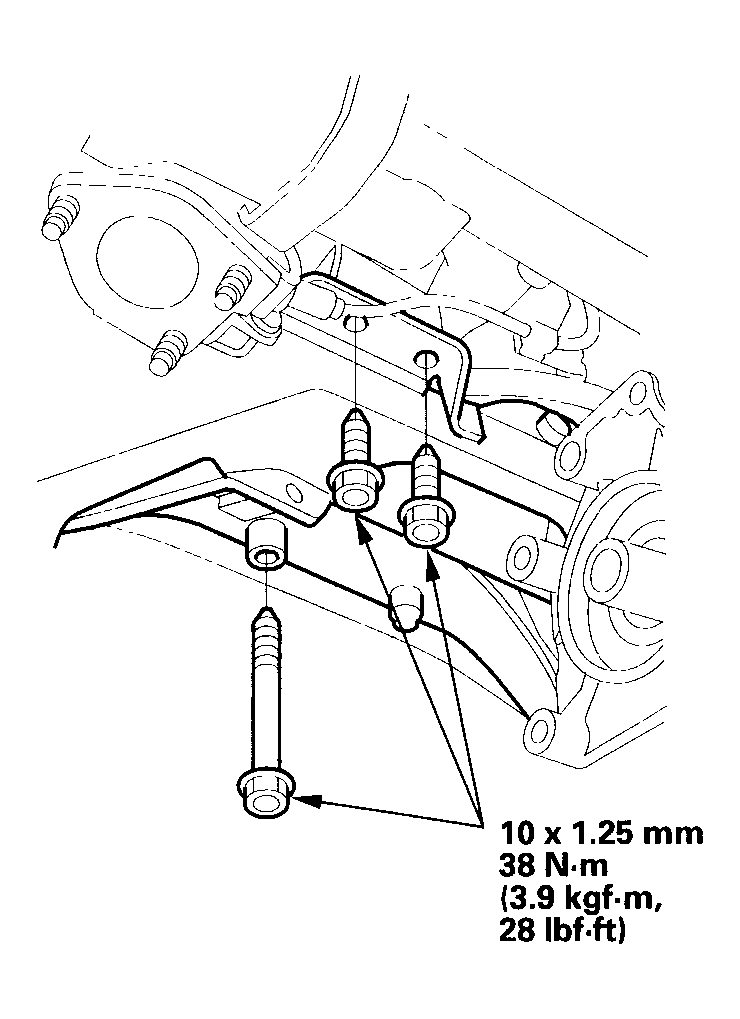
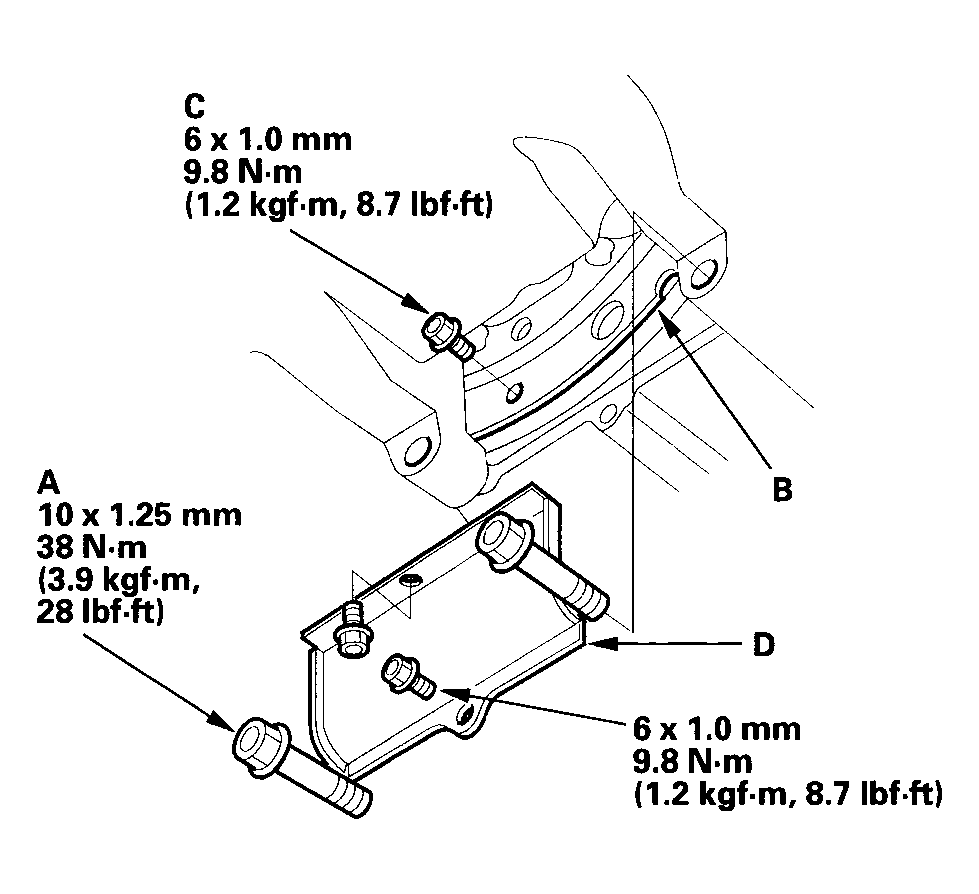
- Install the front subframe stiffener.
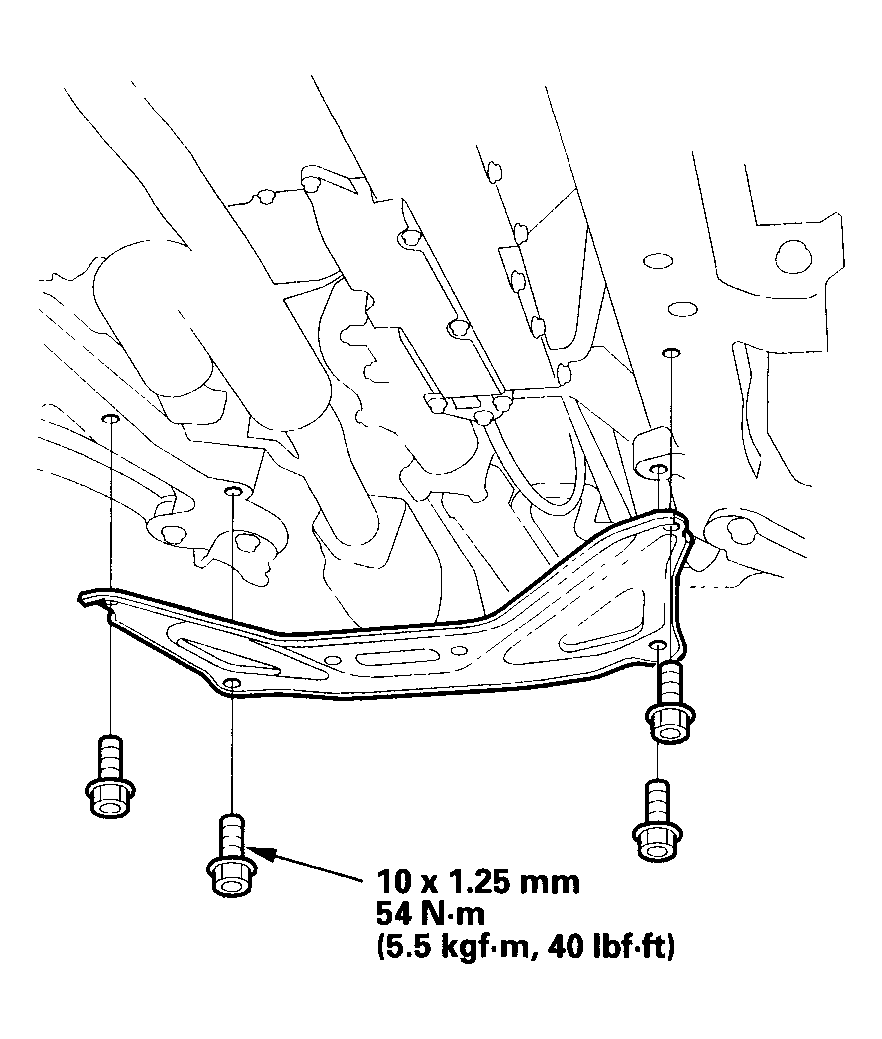 Courtesy of AMERICAN HONDA MOTOR CO., INC.
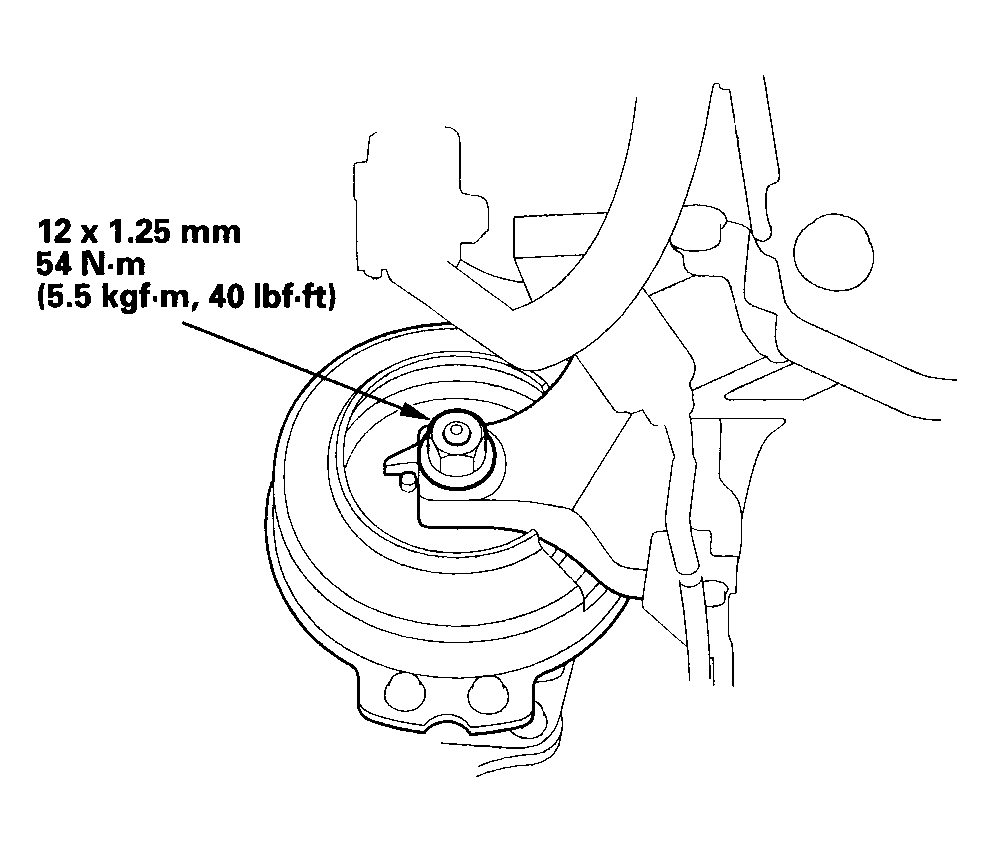
- Install and tighten the front mount nut.
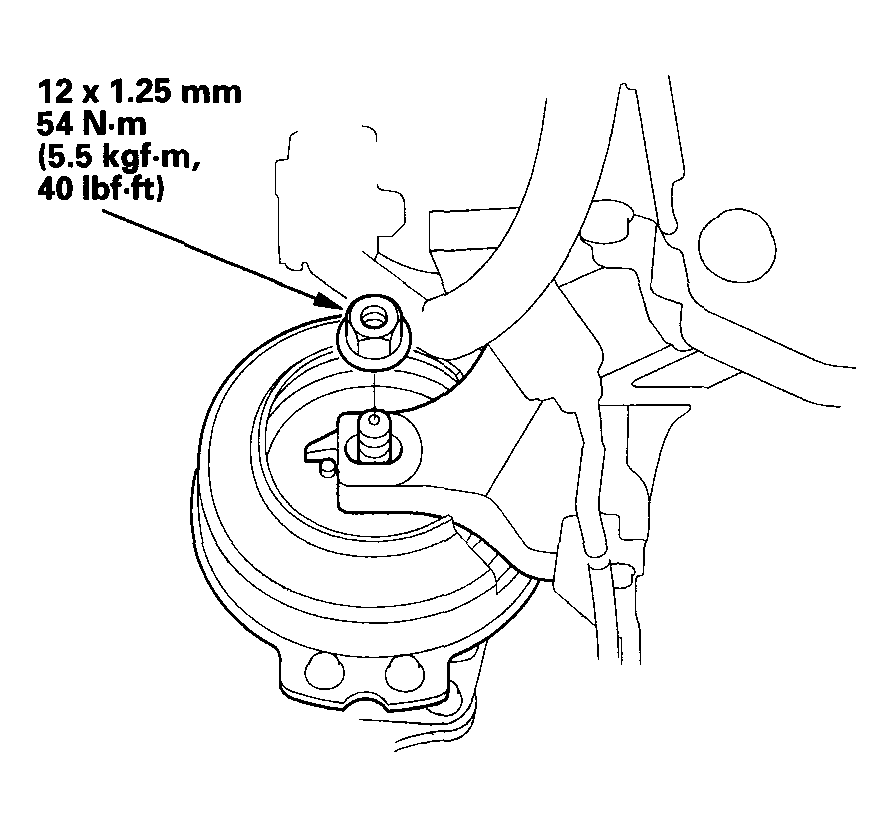 Courtesy of AMERICAN HONDA MOTOR CO., INC.
- Remove the engine hanger from the engine.
- Install the harness cover (A) on the engine harness bracket (B).
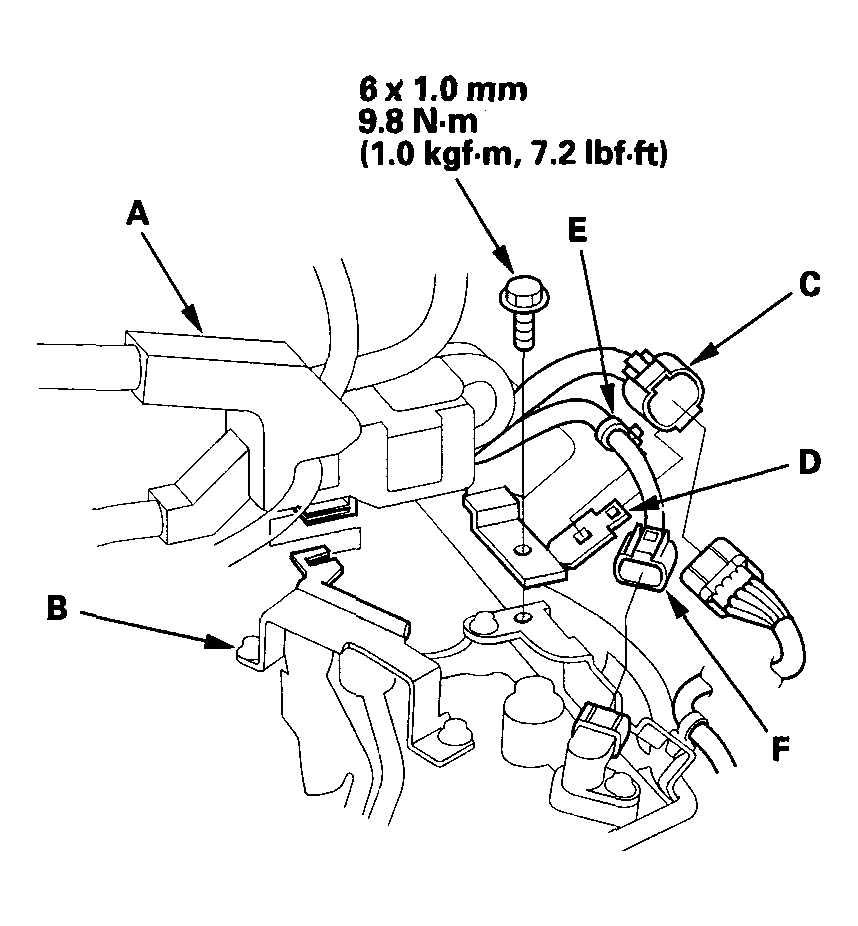 Courtesy of AMERICAN HONDA MOTOR CO., INC.
- Connect the transmission range switch connector (C), then install it on the connector bracket (D). Install the harness clip (E) on the connector bracket.
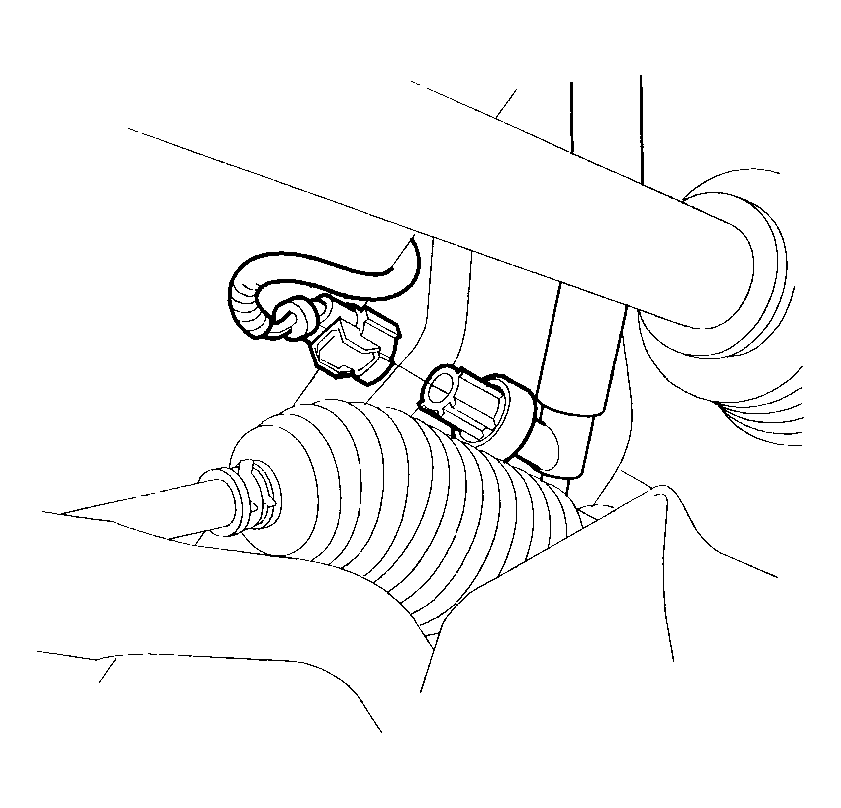
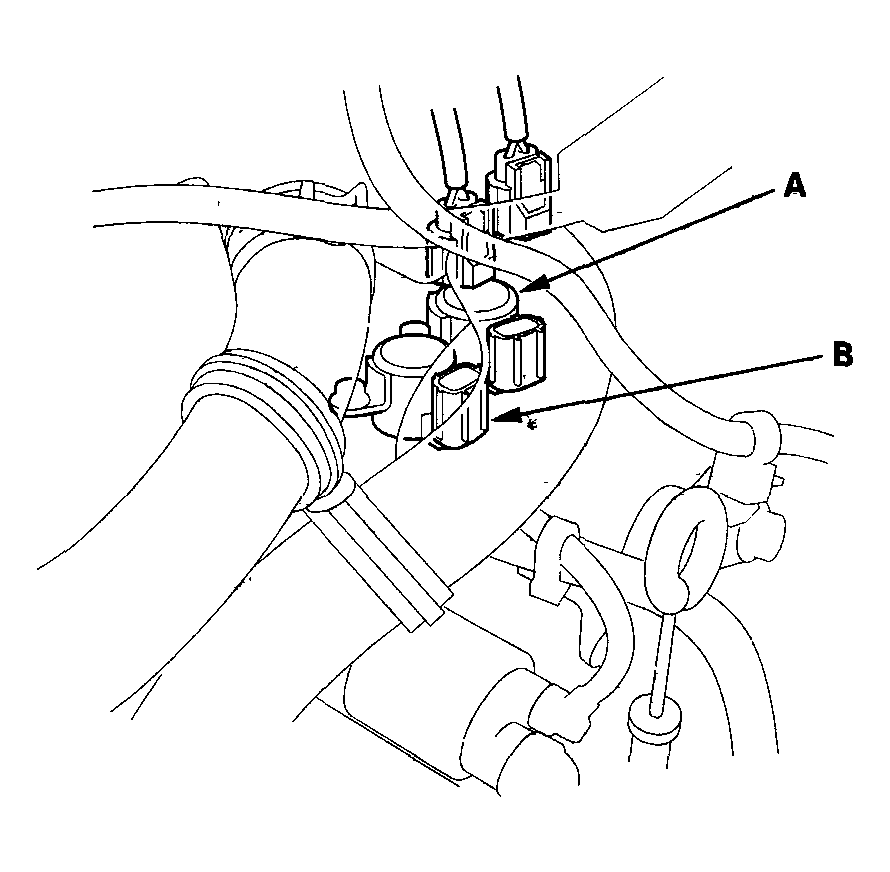
- Connect the output shaft (countershaft) speed sensor connector (F).
- Connect torque converter clutch solenoid connector (A) and shift solenoid valve B connector.
 Courtesy of AMERICAN HONDA MOTOR CO., INC.
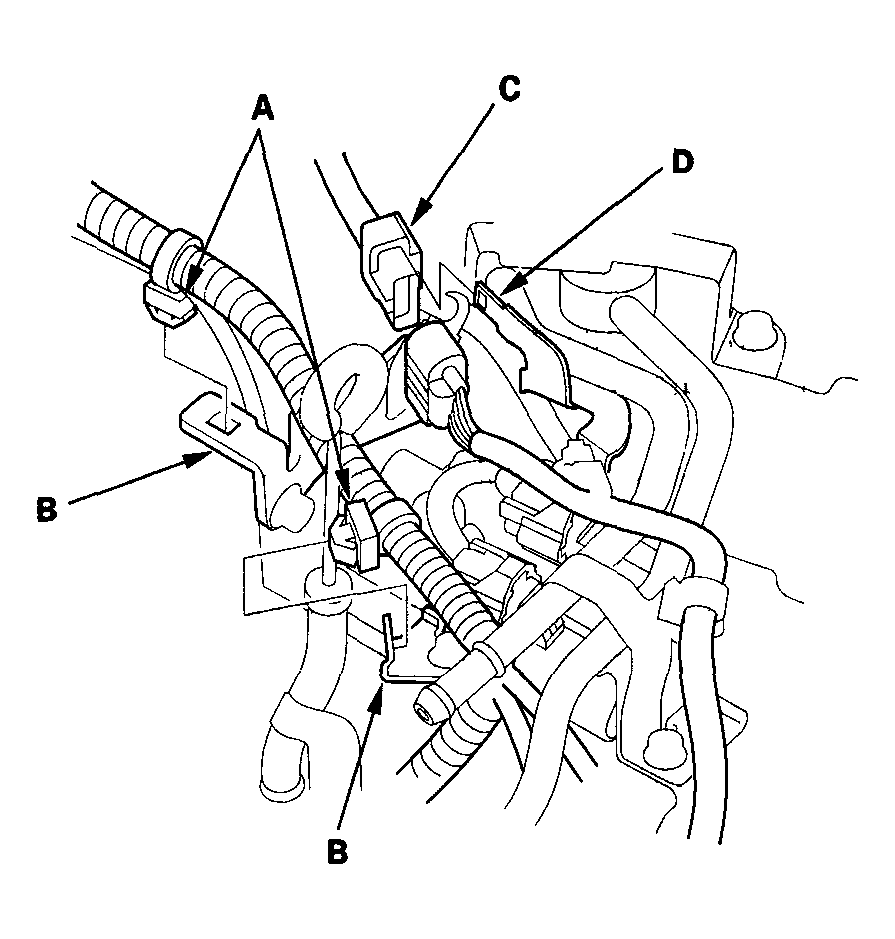
- Install the harness clips (A) on the brackets (B).
 Courtesy of AMERICAN HONDA MOTOR CO., INC.
- Connect the 6P connector (C), then install it on its connector bracket (D).
- Install the transmission ground cable (B).
 Courtesy of AMERICAN HONDA MOTOR CO., INC.
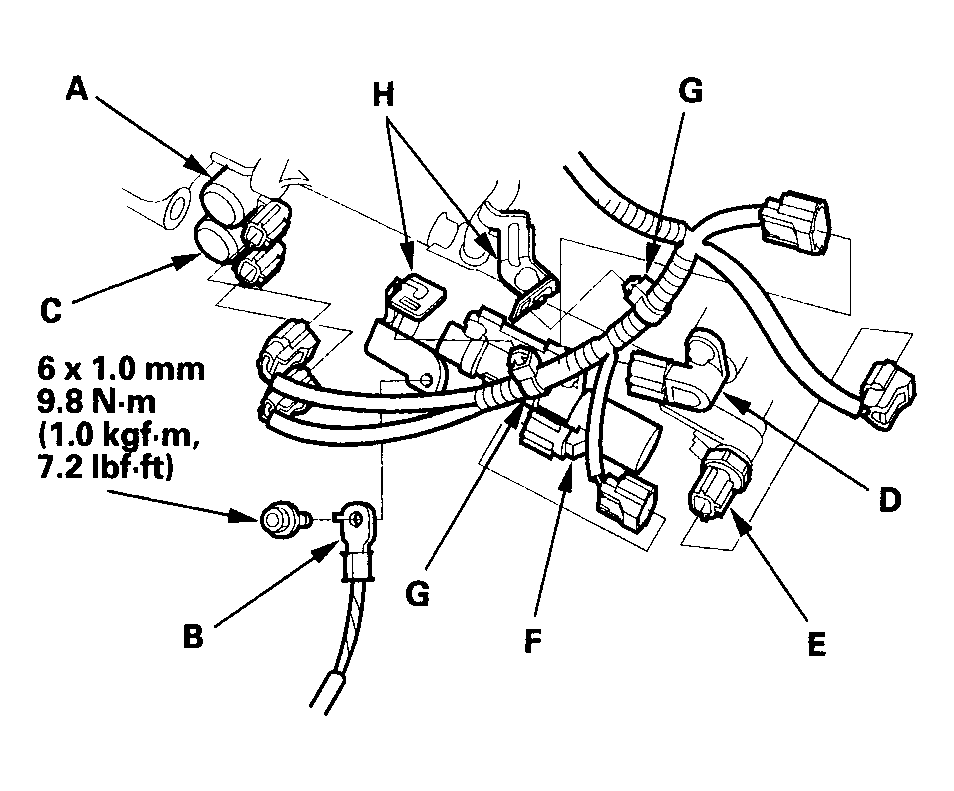
- Connect the connectors to the input shaft (mainshaft) speed sensor (D), 4th clutch transmission fluid pressure switch (E), A/T clutch pressure control solenoid valve C (F), and shift solenoid valves A and C, then install the harness clips (G) on the brackets (H). Do not allow water, fluid, oil, dust, or other foreign particles to enter any of the connectors.
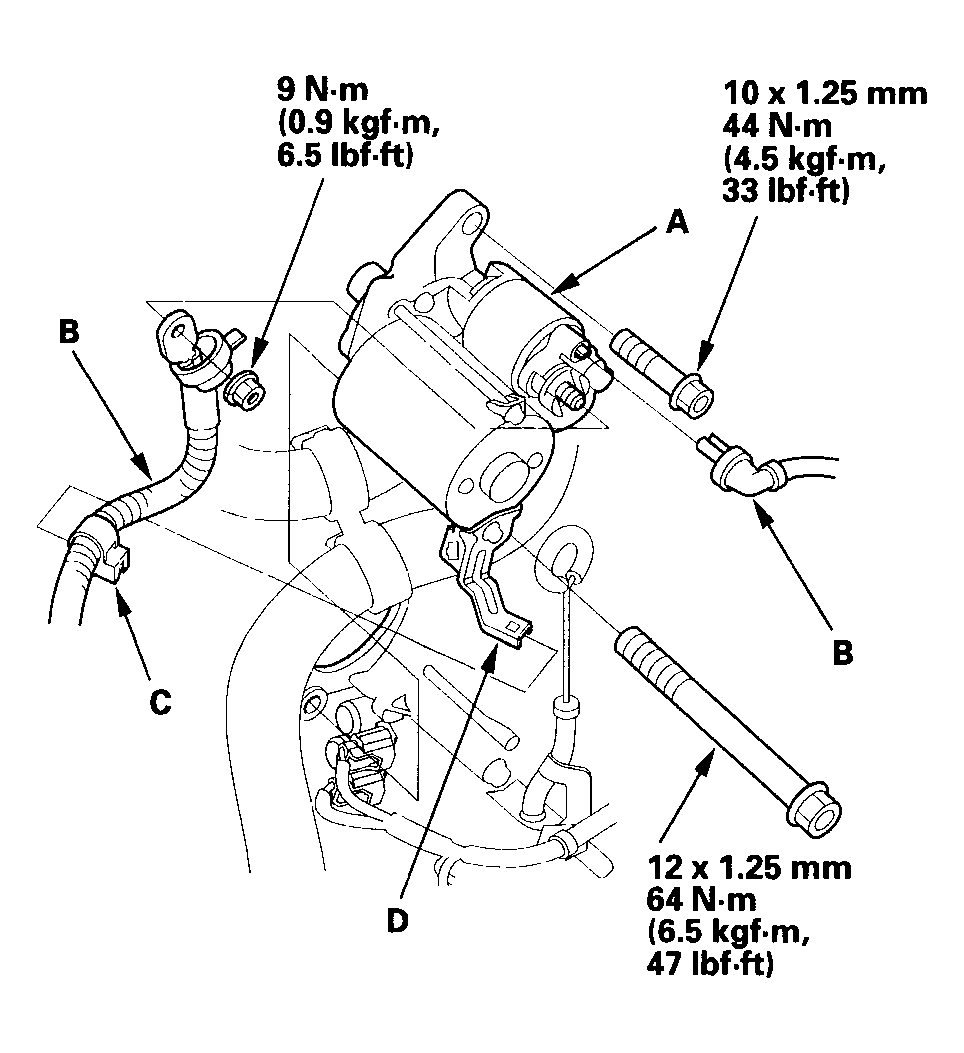
- Install the starter (A) on the torque converter housing. Connect the starter cables (B) to the starter, and install the harness clip (C) on the bracket (D). Make sure the crimped side of the starter cable ring terminal is facing out.
 Courtesy of AMERICAN HONDA MOTOR CO., INC.
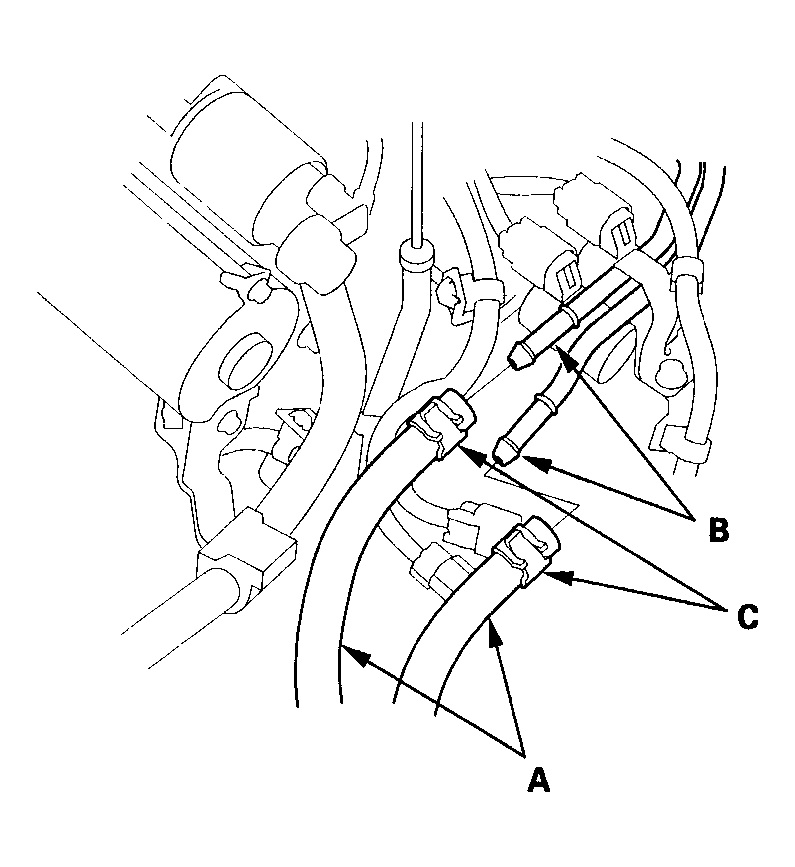
- Connect the ATF cooler hoses (A) to the ATF cooler lines (B), then secure the hoses with the clips (C) (see ATF COOLER HOSE INSTALLATION
).
 Courtesy of AMERICAN HONDA MOTOR CO., INC.
- Install the transmission breather tube clamp (A) into its clamp (B).
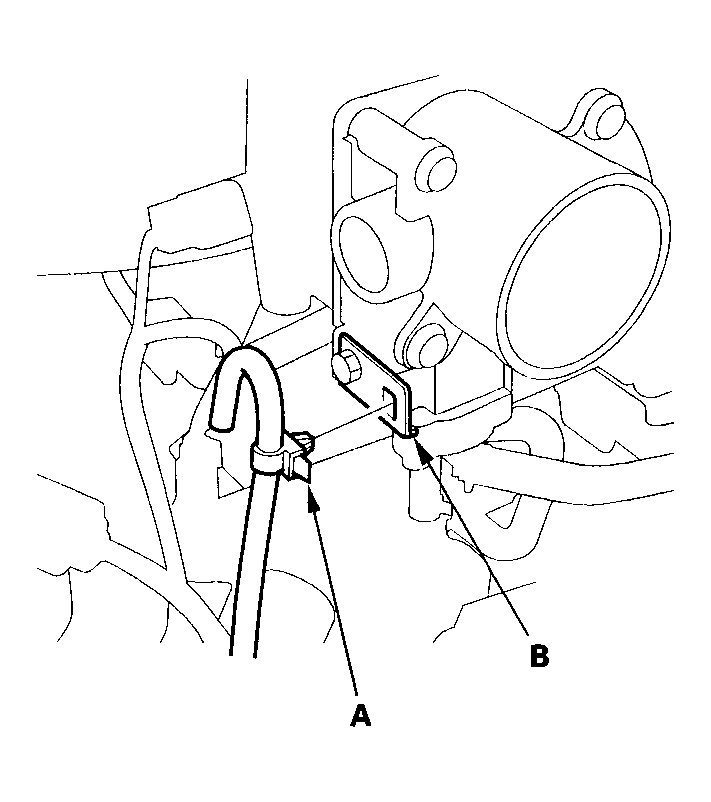 Courtesy of AMERICAN HONDA MOTOR CO., INC.
- Install the battery base.
- Install the harness bracket on the battery base.
- Install the battery tray and battery, then secure the battery with its battery hold-down bracket.
- Install the power steering pump outlet hose (A) with a new O-ring (B) to the pump (C), and secure the hose clamp with the bolt.
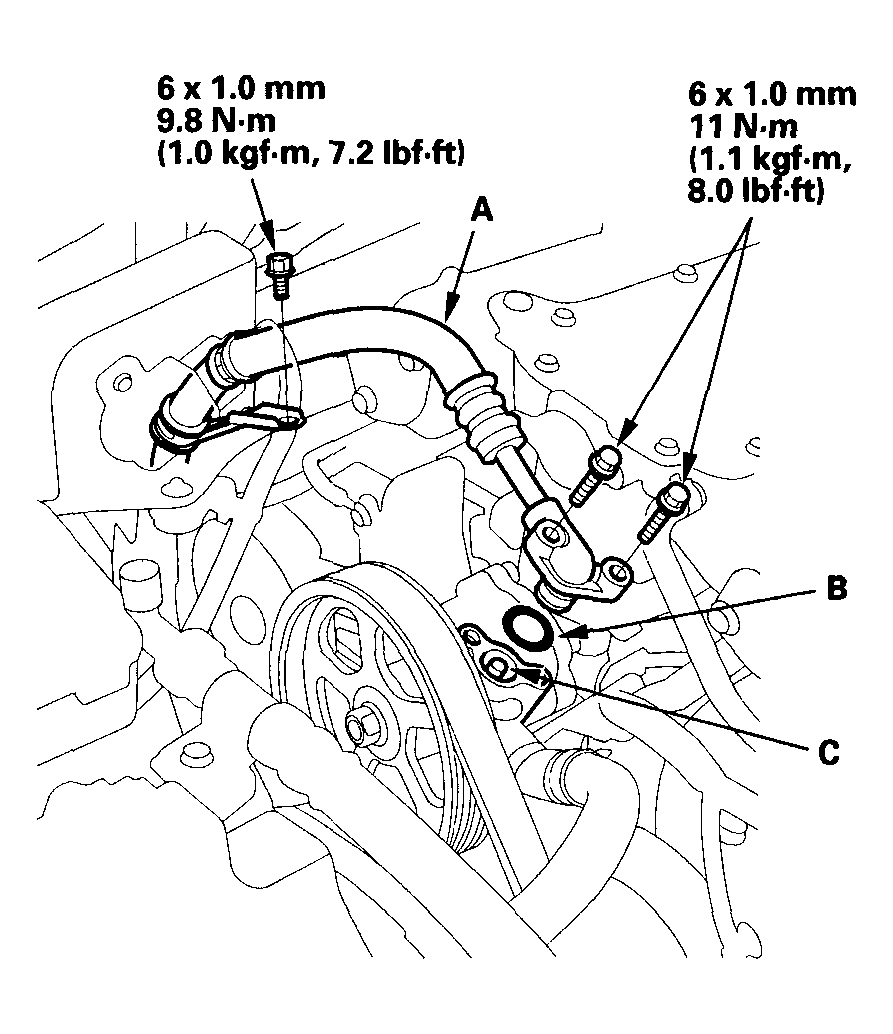 Courtesy of AMERICAN HONDA MOTOR CO., INC.
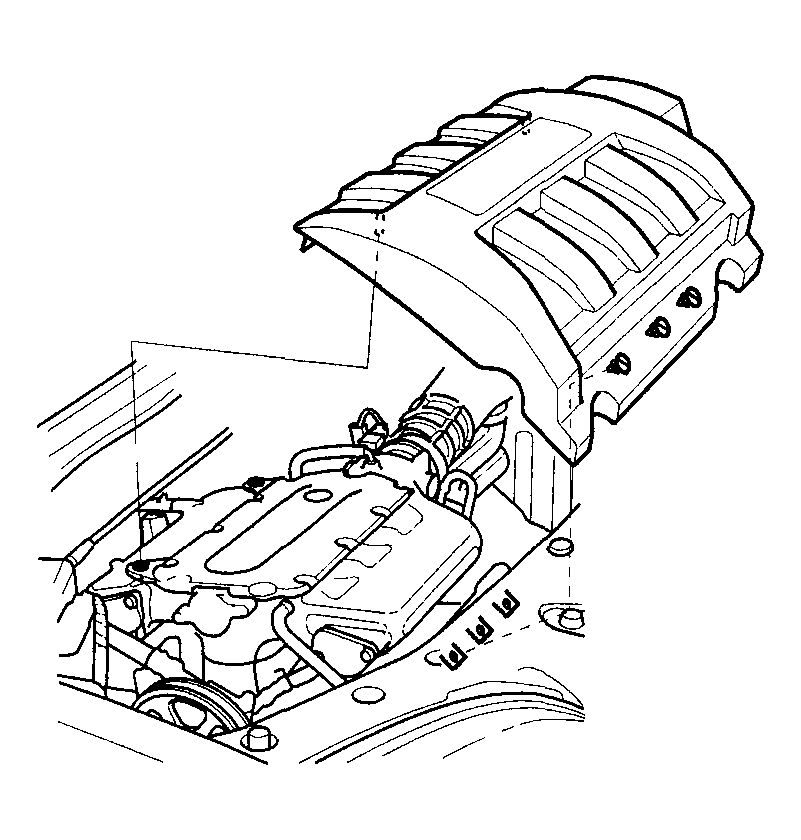
- Install the intake air duct.
- Install the intake manifold cover.
 Courtesy of AMERICAN HONDA MOTOR CO., INC.
- Connect the steering joint (A) to the steering gearbox pinion shaft (B) by aligning the reference mark (C), and secure them with the steering joint bolt.
 Courtesy of AMERICAN HONDA MOTOR CO., INC.
- Install the steering joint cover (D), and put the carpet back.
- Refill the power steering system with fluid (see
FLUID REPLACEMENT
).
- Refill the transmission with ATF (see step 5
).
- Install the splash shield.
- Connect the battery positive terminal, then connect negative terminal.
- Set the parking brake. Start the engine, and shift the transmission through all gears three times.
- Check the shift lever operation, A/T gear position indicator operation, and shift cable adjustment.
- Check and adjust the front wheel alignment (see
WHEEL ALIGNMENT
).
- Start the engine, and let it reach normal operating temperature (the radiator fan comes on) with the transmission in the P or N position, then turn it off and check the ATF level (see ATF LEVEL CHECK
).
- Do the PCM idle learn procedure (see
PCM IDLE LEARN PROCEDURE
).
- Do the power window control unit reset procedure (see
RESETTING THE POWER WINDOW CONTROL UNIT
).
- Confirm that all systems work properly.
- Perform a road test (see ROAD TEST
).
- Enter the anti-theft code for the radio (and the navigation system), then enter the radio station presets, and set the clock.
- Loosen the front mount nut after the road test, then retighten the nut to the specified torque.
 Courtesy of AMERICAN HONDA MOTOR CO., INC.